 Trey Perry
As a former colleague of mine often said, “It’s just bits.” In this post, we’ll explore IPv4, CIDR notation, and conclude by using some knowledge of both to create an Amazon VPC.

Remember these? You don’t need one for CIDR notation.
Needless to say, I’ve seen some astoundingly complex explanations of CIDR notation and subnets. There are even several books that recommend using tables to memorize the number of usable addresses within common CIDR block sizes. As it turns out, this is all reasonably simple math. With some practical experience, memorization will come naturally. In my opinion, it’s more important to understand the history of IPv4, why CIDR exists, as well as how CIDR notation is used.
First, let’s deconstruct an IPv4 address. Most often, they’re seen in dotted decimal form (e.g. 192.168.0.1). The address itself is 32 bits in length; each bit (binary digit) may have a value of 0 or 1. The term octet – a grouping of eight – is used to describe each segment of eight bits. It follows that you’ll find four octets in each IPv4 address.
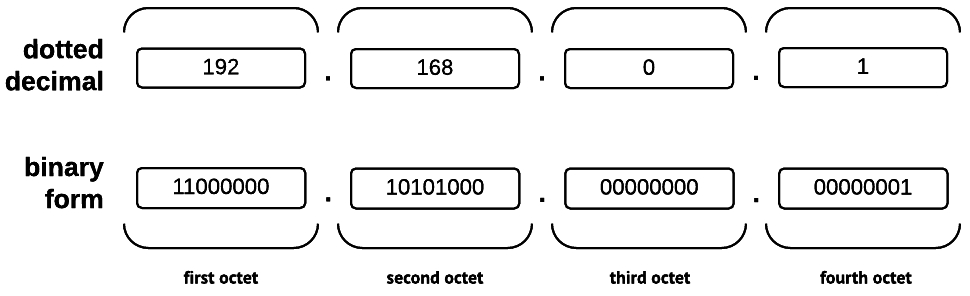
The four octets of an IPv4 address, 192.168.0.1, expressed as decimal and binary numbers.
Indeed, as many readers know, it’s trivial to compute the number of possible values that may be represented by a given number of bits. For example, let’s consider a single byte, in which there are eight bits that may have one of two possible values.
28 = 2 × 2 × 2 × 2 × 2 × 2 × 2 × 2 = 256
As we can see, because a byte contains eight bits, it can represent one of 256 (28) values.
IPv4: Addressing an Evaporating Pool

Predictably, that reserved loopback address block is 127.0.0.0/8.
Because there are 32 bits in each IPv4 address, there is a limit of 4,294,967,296 (232) total addresses. Of course, that oft-cited figure doesn’t include any of the numerous reserved blocks. For example, an entire /8 block – or 16,777,216 addresses – is reserved exclusively for host-local use.
According to the United States Census Bureau, there are over 7 billion people on the planet. Sadly, the International Telecommunication Union estimates that only 40% of us have Internet access. However, if there are over 2.8 billion people with Internet access, how is it possible that we can sustain ourselves with just 4.3 billion IPv4 addresses? Much like A Flock of Seagulls cover bands, this has been a problem since the 1980s, when IPv4 was first introduced.
Even before the Reagan era had come to an end, it was obvious to some that the address space would slowly become insufficient, although IPv4’s notion of classful networking was intended to prevent the overallocation of large address blocks. If you’ve ever heard the term class used when referring to the size of a network, it is in reference to this historical scheme, in which the leading bits of the IP address were used to determine the network size. Class “A” networks were equivalent to an /8 CIDR block, while the “B” and “C” classes were equivalent to /16 and /24 CIDR blocks, respectively. Although classful networking wasn’t perfect, it was still a big improvement upon the previous scheme, in which only /8 blocks could be allocated.
Did Ford expect that each of these would have an assigned IP address? Maybe they were just ahead of their time.
Unfortunately, the address exhaustion issue was further compounded in the ’90s. Ford Motor Company, Eli Lilly, and Halliburton were assigned their own /8 blocks. Each one contained 16,777,216 IPv4 addresses. Meanwhile, over the same decade, the U.S. Department of Defense accumulated over 200 million IPv4 addresses. When added together, those blocks consumed about 6% of the total IPv4 address space!
Savior of the Internet? I wouldn’t go that far.
As we entered the new millennium, we found clever ways to greatly expand the lifespan of IPv4, even despite the existence of IPv6, whose design uses 128-bit addresses to prevent exactly these issues. A great deal of effort was invested into reclaiming unused IPv4 blocks that had been wastefully allocated. In addition, you’ve probably noticed that your home router assigns IP addresses within the 10.0.0.0/8 and 192.168.0.0/24 blocks, which are reserved for private networks. An entire household or office full of devices may live behind a NAT device, allowing them all to share a single public IP address. Although we did ultimately run out of unused IPv4 addresses, such measures helped delay the inevitable, and allowed us to have some valuable breathing room.
These days, because address scarcities have created a strong demand for IPv4 addresses, all the massive blocks that were “given away” in the ’80s and ’90s have stratospheric price tags. Depending on what the buyer is willing to pay, the estimated1 value of a single /8 block is somewhere between $200 million and $1.5 billion.
A Taste of CIDR
Classless Inter-Domain Routing, or CIDR, was introduced in the ’90s as part of a revised attempt to simplify routing tables and better manage how the address space was allocated. And, of course, it was accompanied by CIDR notation. In the context of IPv4, CIDR network blocks are expressed as a network address like 192.168.0.0, which is followed by a decimal number that indicates the length (in bits) of the network prefix.
For example, let’s examine the CIDR block 192.168.0.0/24. When the first octet, 192, is converted from decimal to binary, the result is 11000000. The second octet, 168, becomes 10101000. The remaining two octets (16 bits) are both 00000000. Therefore, the 32-bit address 192.168.0.0 would be 11000000.10101000.00000000.00000000 in binary form.
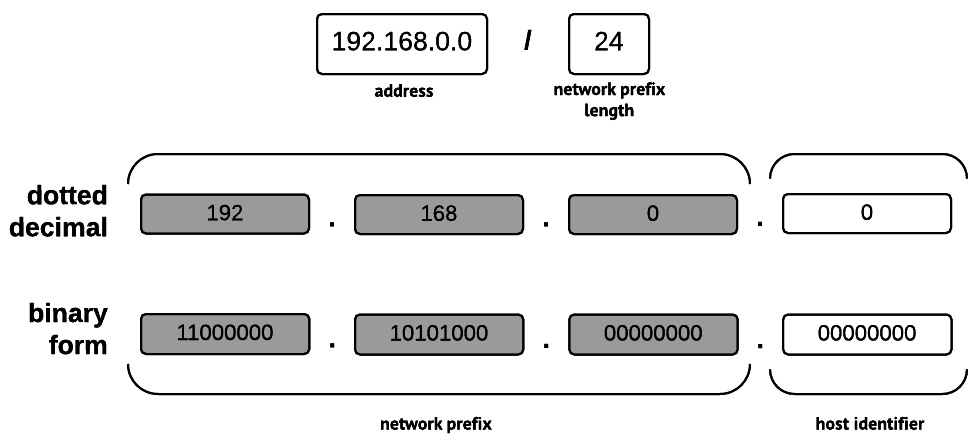
A CIDR block, expressed in CIDR notation, deconstructed. The unused bits determine the number of possible addresses.
Our example CIDR block stipulates a network prefix length of 24 bits; in other words, the first three octets of the address (11000000.10101000.00000000). In this case, because those bits would be used for the network prefix, the subnet mask would be 11111111.11111111.11111111.00000000. When converted back to dotted decimal notation, that is 255.255.255.0, which probably looks more familiar.
The remaining unmasked bits – in this case, the entire final octet (eight bits) – would be used to identify hosts on the network. In order to determine the number of addresses, simply find 2n, where n is the number of unmasked bits. If the subnet contains more than two addresses, subtract two, as the first and last addresses are reserved for identification and broadcast purposes. While 28 (256) total addresses would exist in our example block, only 254 could be used, meaning that hosts would be identified by addresses within the inclusive range of 192.168.0.1 – 192.168.0.254.
With the proliferation of “Internet of Things” devices, that might just cover all the lightbulbs, toasters, dog collars, smart televisions, ovens, refrigerators, sensors, exercise gear, cameras, cars, drones, watches, tablets, phones, and computers in a household. (I won’t lie. I want them all – especially that oven.)
Virtual Private Clouds

Keep this panda happy by using VPCs instead of EC2 Classic.
When your AWS infrastructure is deployed, it exists – or, for anyone still using EC2 Classic, should exist – inside of a Virtual Private Cloud. A VPC is a logically isolated, virtual network within AWS. Because VPCs are actually offered at no additional charge, it’s easy to see why they are a compelling way to control access and isolate resources.
When it comes to how they’re addressed, everything old is new again, as VPCs use IPv4, and CIDR notation is used when configuring them. Unless you prefer to handle your own address assignment, there’s no need to worry about it, as DHCP is provided with each VPC. Similarly, although it’s still an option to manage your own name servers, AWS conveniently provides an internal DNS service.
The IPv4 address range belonging to a VPC is partitioned into subnets. Each subnet has an associated route table. The default route table consists of a “local” route that covers the entire VPC address range, meaning that instances located within all the VPC subnets are allowed to communicate with each other using their private addresses. In addition, network ACL rules may be applied to each subnet, providing more control over inbound and outbound traffic. Meanwhile, VPC security groups are associated with ENIs to enforce nuanced rules on the traffic flowing between individual resources, such as EC2 instances, ELBs, and RDS instances.
Over the past several years, AWS has invested significant effort in making VPCs more flexible. Peering connections allow a VPC owner to enable cross-VPC connectivity from other VPCs, whether or not they own them. In the past, that would have required a VPN connection, which could prove brittle and tedious to manage. Meanwhile, VPC endpoints make it possible for EC2 instances in a VPC to reach AWS endpoints, such as those belonging to Amazon S3, without their traffic leaving the internal AWS network. Just this month, AWS introduced a new feature called VPC Flow Logs, which is used to capture information about network traffic for an entire VPC, a subnet, or an individual ENI. Depending on how it is configured, Amazon’s built-in monitoring service, CloudWatch, may use the collected data to trigger alarms.
All Together Now
Let’s apply our knowledge of IPv4 and CIDR to build a simple VPC. After setting it up, we will launch two EC2 instances in distinct VPC subnets, and then verify that they’re able to communicate with each other.
Before we get started, it’s important to understand a few of the differences between VPCs and other networks. First, VPCs may be no larger than a /16 block. In other words, they can have 216 – or 65,536 – total addresses. It’s a very reasonable constraint, especially when one considers that the default EC2 resource limit for a new account is 20 instances. When creating subnets, keep in mind that AWS reserves the first four IPv4 addresses for their internal services. As one would normally expect, the last address is also reserved. VPC subnets may be as large as the entire assigned IP block; meanwhile, they may be as small as a /28 block, or 14 total addresses.
Now, let’s create our VPC, which will use the 10.100.0.0/16 CIDR block. From the AWS console, navigate to the VPC service. Although there is a VPC wizard, we aren’t going to use it. After all, where’s the fun in that? Instead, we’ll choose “Your VPCs,” and then “Create VPC.”
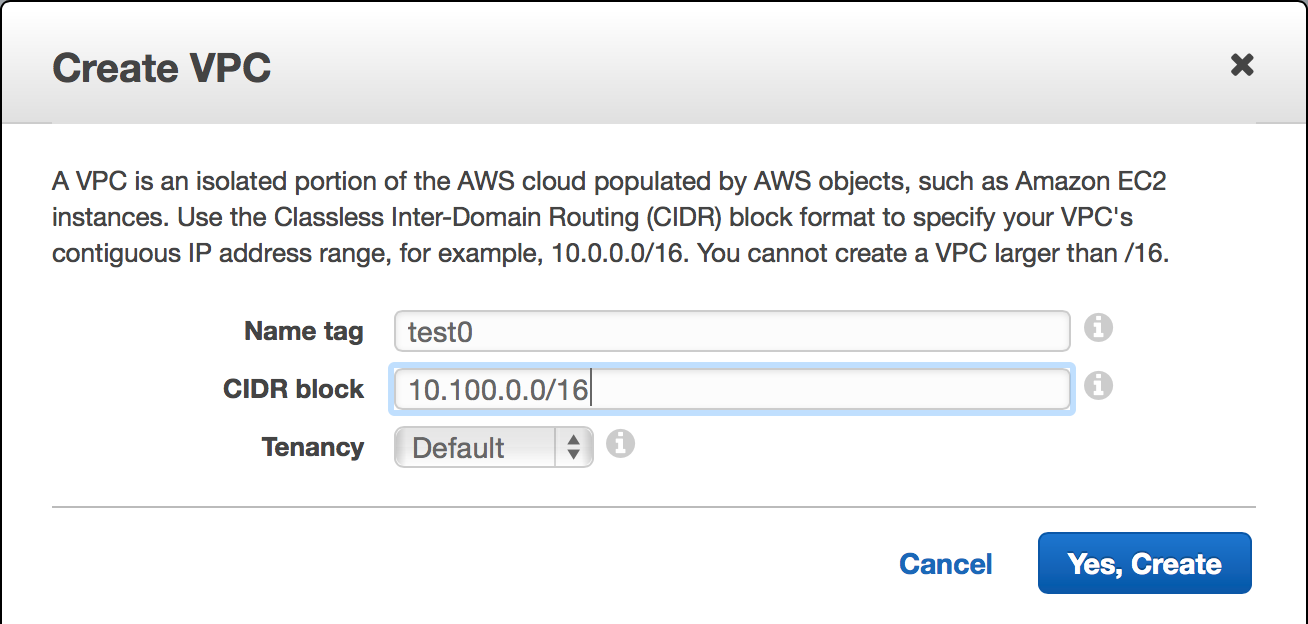
In this case, our VPC will use the 10.100.0.0/16 CIDR block. Tenancy may also be specified. Default tenancy launches your instances on shared hardware, whereas dedicated tenancy ensures that only your instances will run on the host computer(s) where they reside.
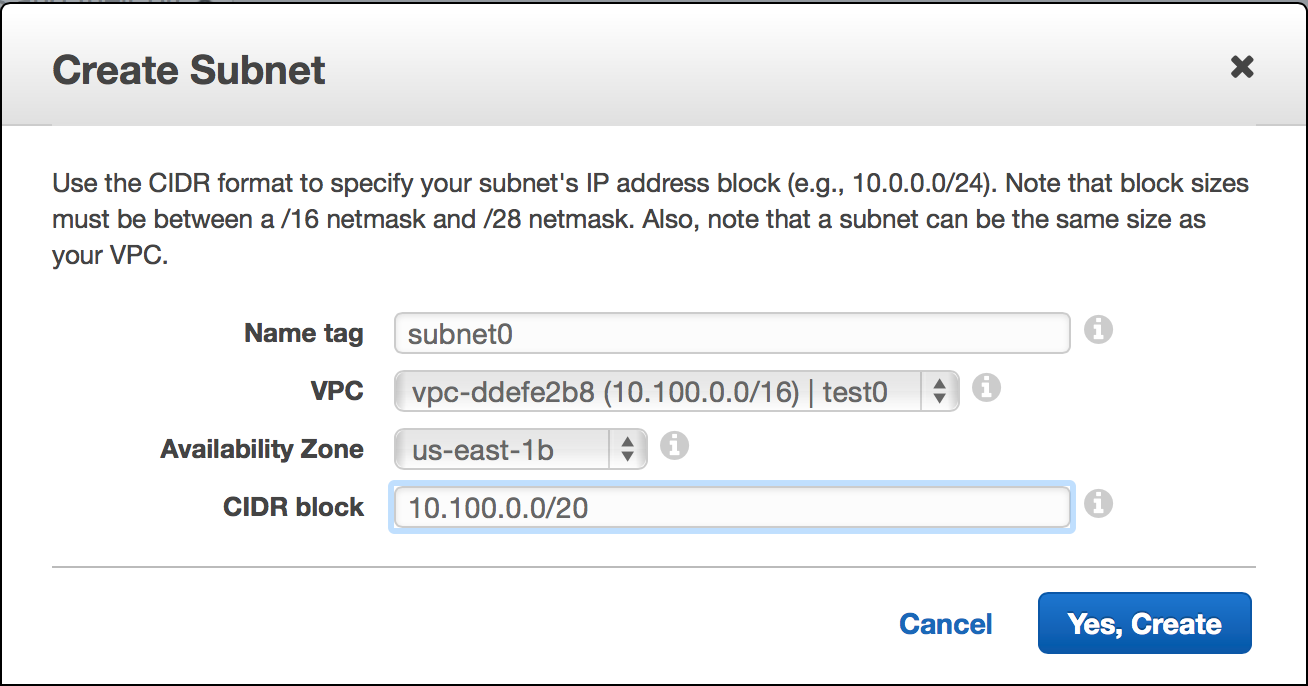
Now that the VPC has been created, it will appear on your VPC dashboard. From there, choose the “Subnets” link. The first subnet will have an assigned CIDR block of 10.100.0.0/20, meaning that it will use 4,096 (212) total addresses within the inclusive range of 10.100.0.0 – 10.100.15.255.
Each VPC subnet resides within a single AWS availability zone. By strategically choosing the placement of your resources, you can optimize for a given use case. For example, when using an eventually consistent database, your specific use case might cause you to optimize more for availability than consistency or resistance to a network partition, so you might have resources deployed into several availability zones. (Truly mission-critical services should be replicated in multiple AWS regions.)
How did I come up with the address range? While you already know your starting address, you might need to find the last address. Because a /20 block uses half of the third octet (four of the eight bits) as part of the network prefix, you can compute the subnet address range by converting the “all-ones” binary value of the unused four bits – 1111 – into a decimal number. In this case, the converted decimal number would be 15. Since you already know that the final octet will be used for host identification, simply convert the “all-ones” binary value of those bits – 11111111 – into a decimal number as well. The result is 255. Finally, take the first two decimal octets, 10.100, and append the two decimal numbers that we’ve just converted from binary. The final address within the subnet is 10.100.15.255.
Since we will be creating another subnet, it stands to reason that the next starting address might be 10.100.16.0. In practice, you could choose any unused block, but that one would make sense. The second subnet will also be a /20 block, but it will reside in a different availability zone.
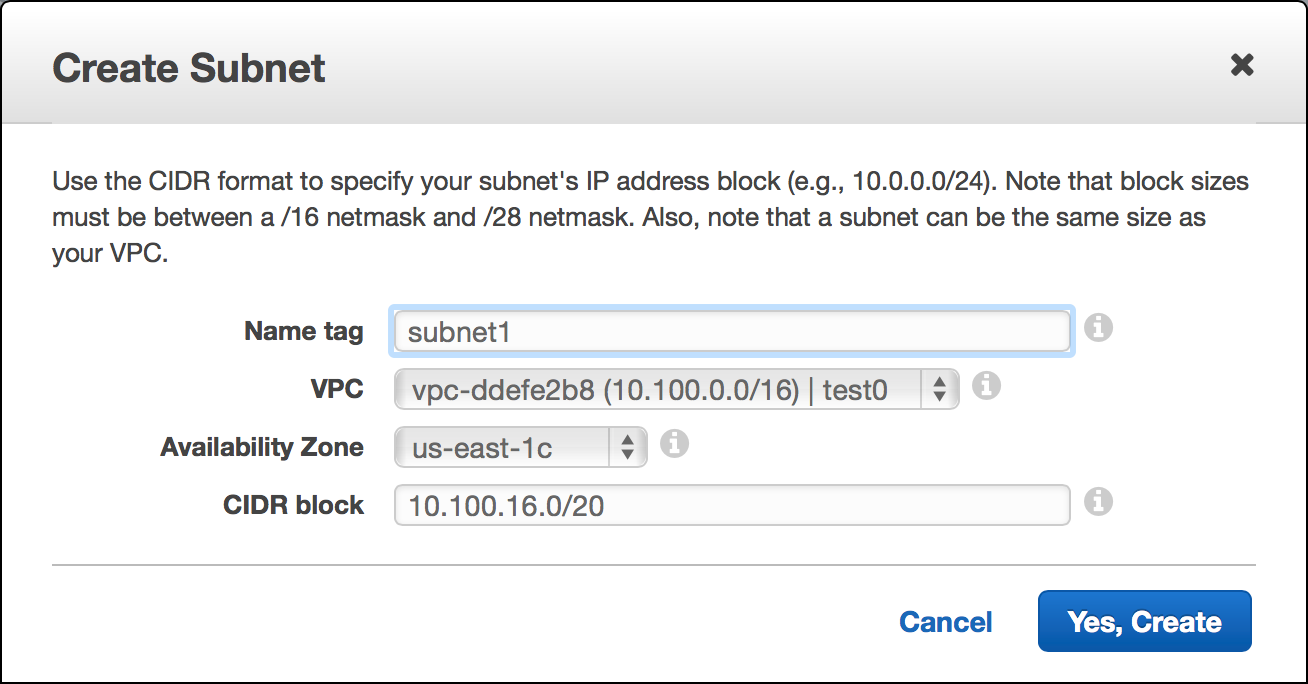
Our second VPC subnet is also a /20 block, with 4,096 total addresses. Because AWS reserves five of them, there are 4,091 usable IP addresses. The assigned CIDR block is 10.100.16.0/20, making the address range 10.100.16.0 – 10.100.31.255.
At this point, both VPC subnets should be visible in the AWS console.

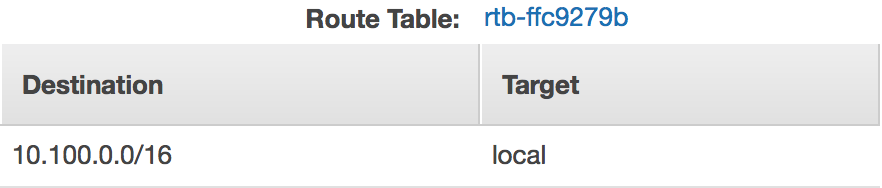
In addition, the main route table ensures that both instances will be able to communicate with each other using their private addresses.
Before we can verify connectivity by launching our EC2 instances, however, we will need to create an Internet gateway, which allows EC2 instances within a VPC to communicate with the public Internet. Without an Internet gateway, we won’t be able to use SSH. (In the real world, we would never expose SSH directly to the public Internet. Instead, we would use a hardened “bastion” host as a single point of entry to our VPC, and security groups would ensure that only specific trusted networks could connect to the service at all.)
Creating an Internet gateway is very straightforward. Simply follow the “Internet Gateways” link within the VPC area of the AWS console, and then choose “Create Internet Gateway.”
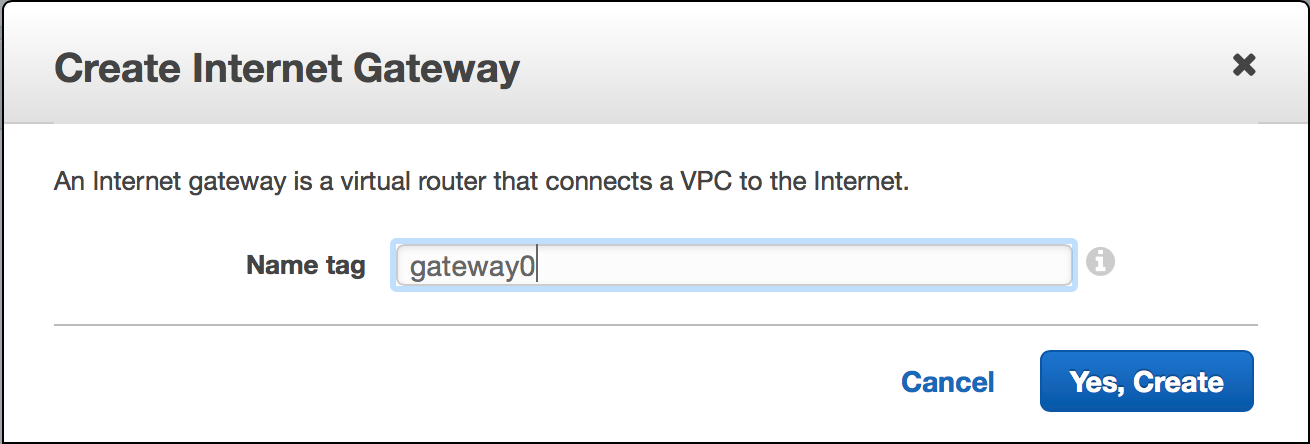
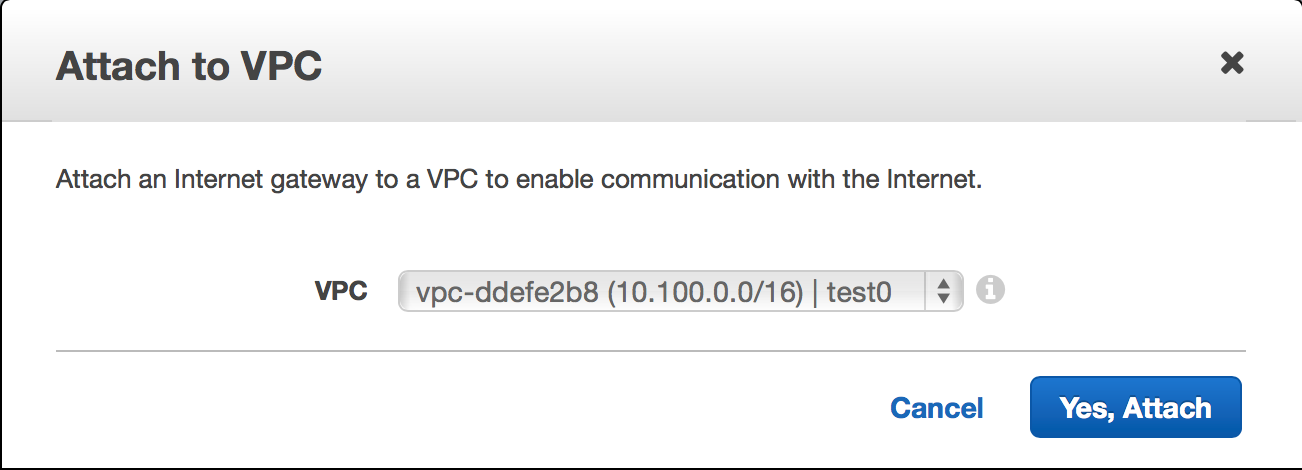
Once the new Internet gateway has been created, it will appear in a detached state. Attach it to the VPC by selecting the gateway and choosing the “Attach to VPC” option.
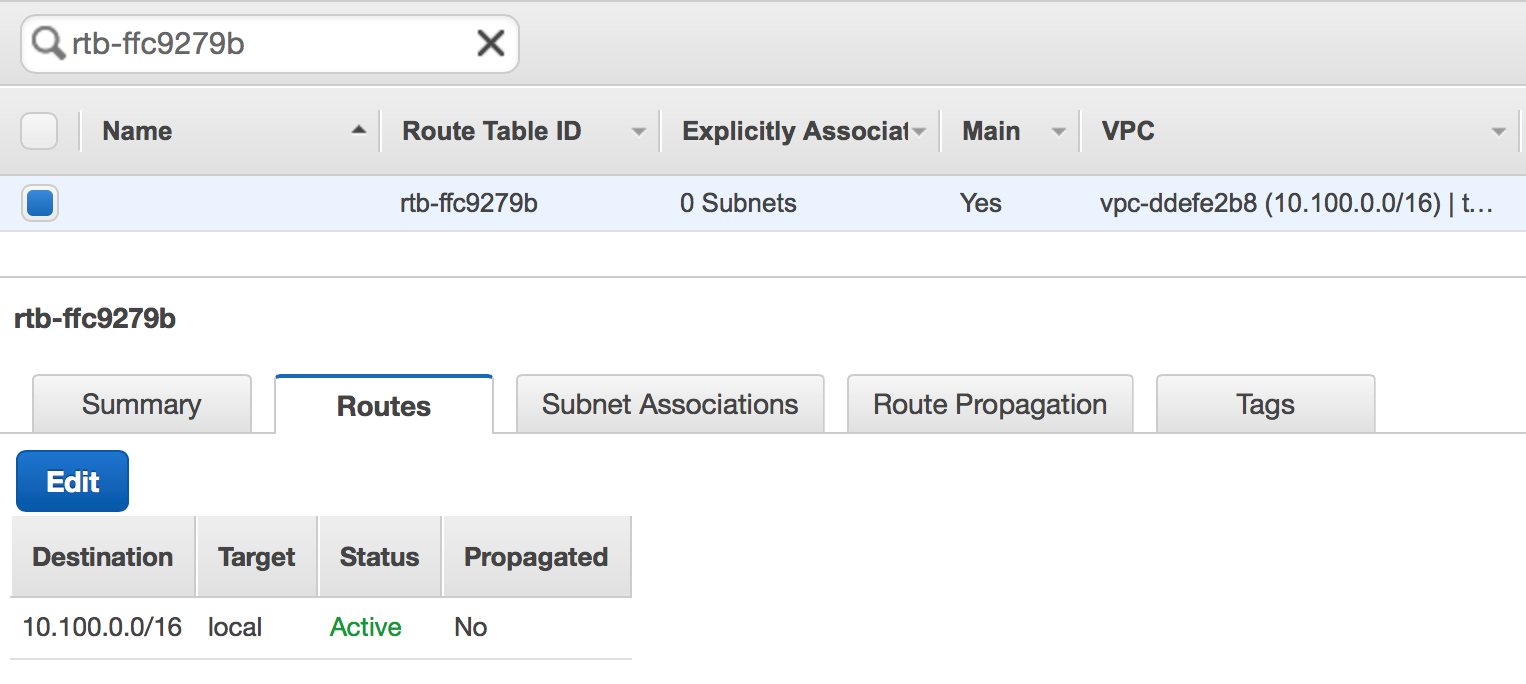
Now that there is an attached gateway, the main route table still requires adjustment. Under “Your VPCs,” select the VPC that you’ve created, and then follow the “Route table” link.
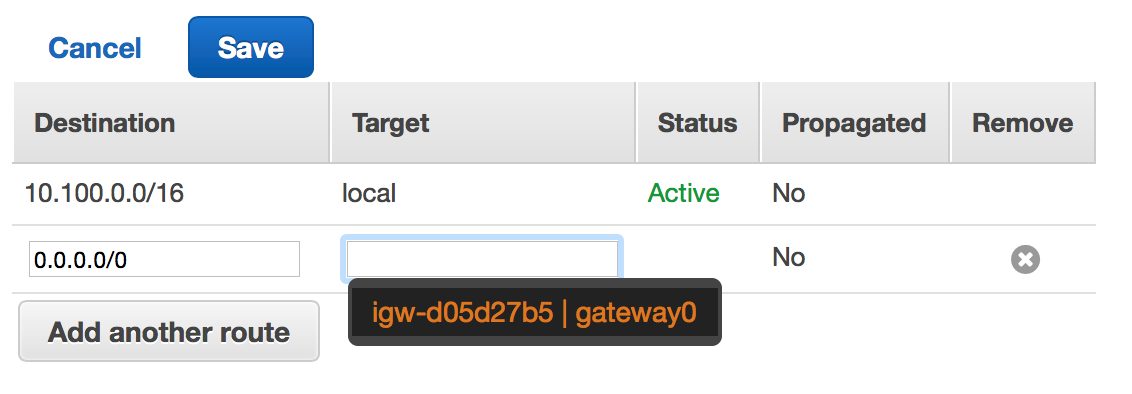
After choosing the “Routes” tab, you’ll see an “Edit” button. After pressing it, choose the “Add another route” button. Enter the CIDR block of 0.0.0.0/0 and choose your newly created Internet gateway. Because 0.0.0.0/0 is the CIDR block for a default route, any traffic that doesn’t match a more specific destination (such as the local route) will be routed through the Internet gateway. Save the edited route table.
It’s finally time to launch two EC2 instances inside the VPC. In order to do so, navigate to the EC2 service within the AWS console, and then choose the “Launch Instance” button. Select the default Amazon Linux AMI, and then accept the default t2.micro instance size. Next, on the “Configure Instance Details” step, pick the VPC, as well as the first listed subnet.

When creating your new EC2 instance, be sure to enable the auto-assignment of a public IP address. We’ll use the public address to reach the instance.
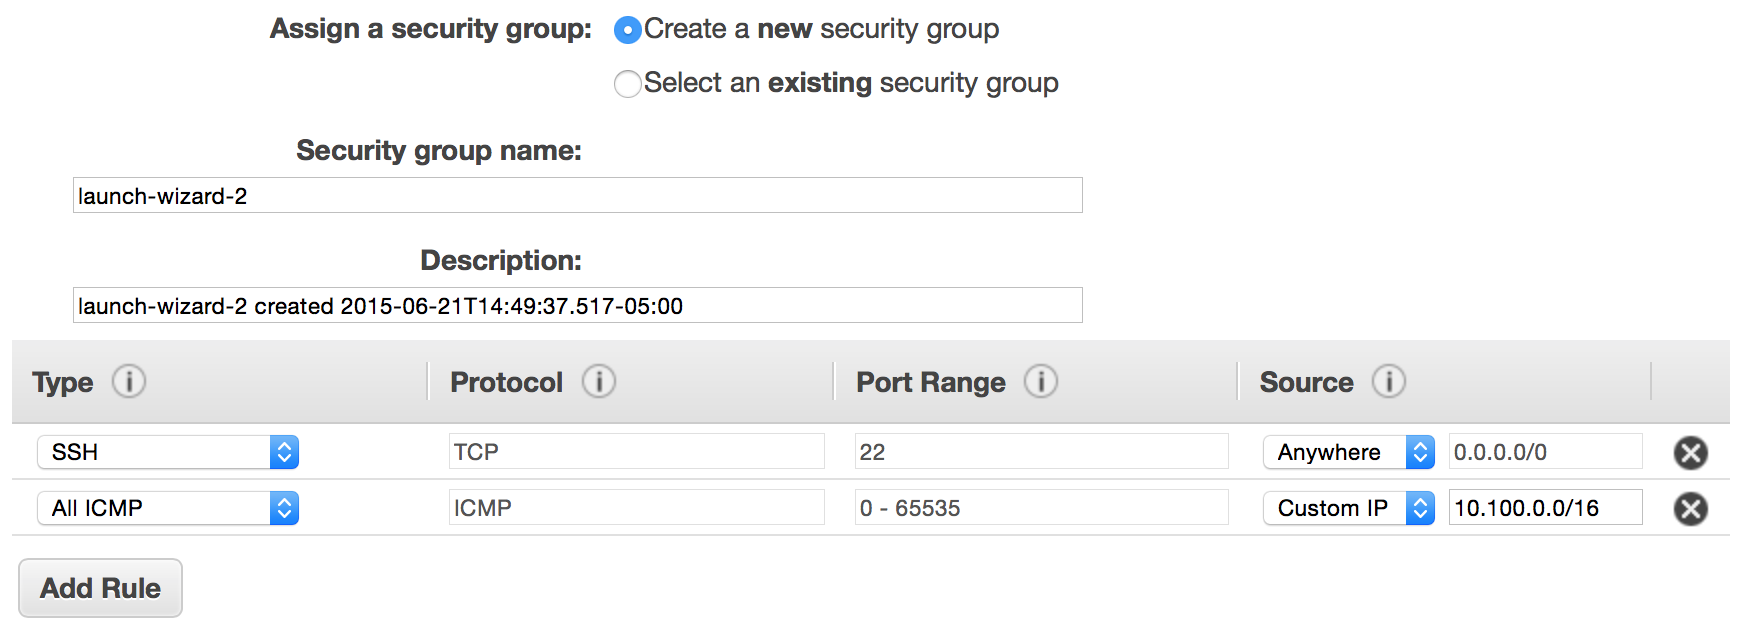
Continue to follow the instance creation steps until you reach the sixth step, “Configure Security Group.” The default will allow any address to connect to TCP port 22, which is used by SSH. I’ve added a second rule that will allow other instances within my VPC to ping my newly created instance.
Finally, launch the EC2 instance, and then follow the same steps to launch a second EC2 instance. When launching the second EC2 instance, however, choose the second VPC subnet.

When launching our second EC2 instance, we’ve chosen the second listed VPC subnet. Be sure to enable auto-assignment of a public IP address.
After you’ve configured the instance security group and launched it, you should have two running EC2 instances listed in your console. Once they have successfully booted, you will be able to connect using SSH.

Two EC2 instances are now running. Because they are located in different subnets (and those subnets are in different availability zones), their availability zones are different.
Select the first instance to reveal the assigned public IP address. In my case, it is 54.173.2.45.

Using your SSH client, connect to the EC2 instance.
Treys-MacBook-Pro:~ treyperry$ ssh ec2-user@54.173.2.45

 __| __|_ )
 _| ( / Amazon Linux AMI
 ___|\___|___|

https://aws.amazon.com/amazon-linux-ami/2015.03-release-notes/
25 package(s) needed for security, out of 54 available
Run "sudo yum update" to apply all updates.
[ec2-user@ip-10-100-10-40 ~]$
Returning to the AWS console, choose the other EC2 instance, and then find its assigned private IP address.

In this example case, the private IP address assigned to the other instance is 10.100.25.57.
Finally, try to ping the other instance. The ping utility is commonly used to measure latency and packet loss. It will send an ICMP echo request; as long as our route tables and security groups have been properly configured, the other instance will respond with an ICMP echo reply.
[ec2-user@ip-10-100-10-40 ~]$ ping -c4 10.100.25.57
PING 10.100.25.57 (10.100.25.57) 56(84) bytes of data.
64 bytes from 10.100.25.57: icmp_seq=1 ttl=64 time=1.03 ms
64 bytes from 10.100.25.57: icmp_seq=2 ttl=64 time=1.02 ms
64 bytes from 10.100.25.57: icmp_seq=3 ttl=64 time=1.14 ms
64 bytes from 10.100.25.57: icmp_seq=4 ttl=64 time=1.19 ms

--- 10.100.25.57 ping statistics ---
4 packets transmitted, 4 received, 0% packet loss, time 3004ms
rtt min/avg/max/mdev = 1.020/1.099/1.197/0.077 ms
That’s it! If you’ve followed along, you have successfully applied a bit of IPv4, CIDR, and VPC knowledge to create a simple Virtual Private Cloud in AWS. In addition, you’ve created an Internet gateway, modified the main route table to include the appropriate default route, and configured two “public” subnets. Finally, you have created an EC2 instance within each subnet, and verified that they are able to communicate with each other using their private network addresses.
1 When defunct retail giant Borders sold a /16 block of IPv4 addresses to Cerner Corporation in 2011, the buyer paid about $12 for each address. Unsurprisingly, significantly higher estimates are typically given by address “brokers” like Addrex.
Article Image Credit: “Connections” by Doug. Licensed under CC BY-NC-ND 2.0 via Flickr. Doormat Image: “There’s no place like 127.0.0.1” by Andréia Bohner. Licensed under CC BY 2.0 via Flickr. Panda Image: “Panda” by mozzercork. Licensed under CC BY 2.0 via Flickr. Ford Taurus: Sourced from Wikipedia. Linksys Wireless Router: Sourced from Wikipedia. Elementary Multiplication Table: Courtesy Math Worksheets 4 Kids.
